How about a crochet tote bag you are going to really like carrying around? Let’s get to making one with the bloom crochet tote bag pattern.
Purchase an AD-Free version of the square and bag on Ravelry

The Bloom Crochet Tote Bag is obviously made from joined crochet squares. I designed the squares a while back, but it took me long enough to put them together; simply because I do not enjoy joining crochet squares, but then we sometimes have to do things we do not enjoy and eventually we just might start liking it.
I definitely like how the Bloom Crochet Tote Bag turned out. Who knows? I may be designing more crochet items from crochet squares in future.

CONSTRUCTION
As mentioned, this crochet tote bag is made from joined squares, so the first step is to crochet the square- you can find the in bloom crochet square pattern here. You need a total of fifteen squares.
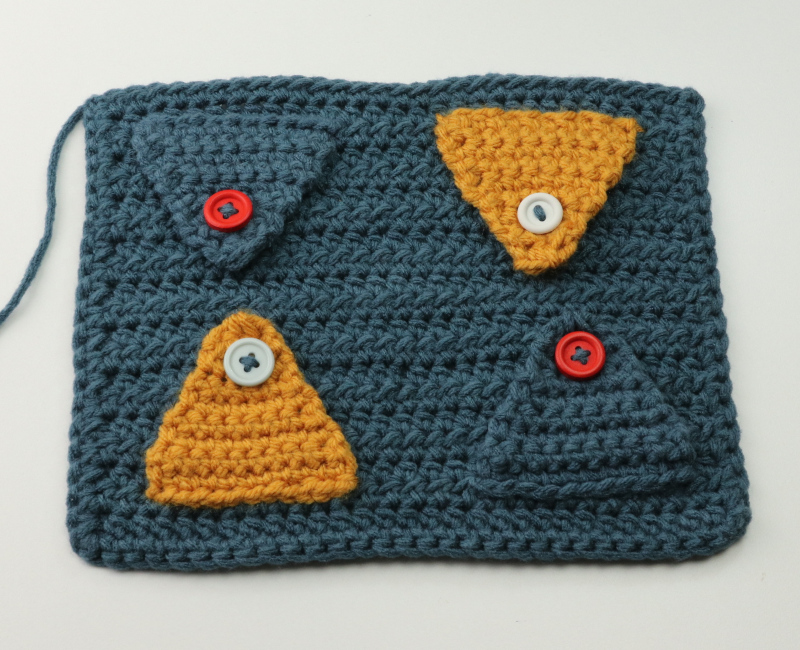
After that, you can join the squares in your preferred way, whether by sewing or slip stitching the squares together. The video tutorial guides you on slip stitching the squares together. Did you notice that the second photo does not have 15 squares? That’s because it is laid flat. Once the first eleven squares have been joined, you will fold then fold it to its shape and join the remaining four squares.
You also have the choice of attaching two handles to your bag.


Please see the video tutorial as a guide, as this post only guides you through the second part of the crochet tote bag. Without further ado, let’s get to making.
MORE CROCHET BAG PATTERNS TO TRY
- Tapestry Crochet Crossbody Bag– this one is a favourite of many
- Reversible Carry-all Tote– big enough for a little extra items
- Puff Stitch Crochet Flap bag– also another favourite
- Eco-friendly Market Bag – one for nature
SHOP YARN CRAFTEE PATTERNS
All patterns and materials shared on www.yarncraftee.com (unless otherwise stated) are copyright Bekisu Obomighie aka Rose Obom. Please read more on the Privacy Policy page. Thank you.
CROCHET TOTE BAG FROM CROCHET SQUARES
Disclosure– This post may contain affiliate links; from which Yarn Craftee will receive a commission should you make a purchase.
Finished Size- 9.5 inches wide / 12 inches height (without handles)
Materials:
- Worsted Weight, medium 4 Cotton yarn. DROPS Paris 50g/75mtrs. Substitute with Paintbox yarns Cotton Aran
- 4.5mm hook
- Tapestry Needle
- Ring handle (4.5 inches circumference)
Stitches/Abbreviation:
- DC- double crochet
- DC2tog- double crochet 2 together or double crochet decrease
- CH- chain
Notes:
- Pattern is written in U.S terms
- Ch 2 at the end of row counts as first stitch on next row (unless otherwise stated)
- Instructions in parenthesis [ ] mean to repeat the same thing the number of times specified across the stitches
- The joining is done in the BACK LOOP ONLY of the stitches
Make the squares- In Bloom Crochet Square Motif Patternn

Due to the dark yarn, you may not see the stitches clearly in the video tutorial. This pictorial is to show you the critical points of joining.
- Chain 2 space- the corner where we go right into the space
- 1st stitch- one of two stitches done into the previous ch 2 space, serves as the first stitch to join into
- 2nd stitch- the second stitch to join into
- 1st chain- one of two chains at the corner, where we join into before going into the chain 2 space
Purchase an AD-Free version of the square and bag on Ravelry
VIDEO TUTORIAL
PATTERN
Row 1: Join yarn in cha 2 space, ch 2, skip next st, DC in 12 st, *skip the ch 2 spaces on the squares, DC in 13 sts, repeat from * over the next 2 squares. On the last square, skip st, DC in ch space. Ch 2, turn.
Row 2: DC2tog in next 2 sts, DC in 9 sts, [skip 2 sts (those stitches between the squares), DC in next 11 sts] repeat 2 times. Skip 2 sts, DC in 9 sts, DC2tog in next 2 sts, DC in top of ch 2. Ch 2, turn
Row 3: DC2tog in next 2 sts, DC in 7 sts, [skip 2 sts, DC in 9 sts], repeat 2 times. skip 2 sts, DC in 7 sts, DC2tog in next 2 sts, DC in top of ch 2. Ch 2 turn
Row 4: DC2tog in next 2 sts, DC in 5 sts, [skip 2 sts (those stitches between the squares), DC in next 7 sts] repeat 2 times. Skip 2 sts, DC in 5 sts, DC2tog in next 2 sts, DC in top of ch 2. Ch 2, turn. STOP HERE IF YOU’RE USING RING HANDLES. SO, INSTEAD OF ENDING WITH CH 2, END WITH CH 1, TURN. Proceed below to complete the handles.
Row 5: DC2tog in next 2 sts, DC in 3 sts, [skip 2 sts, DC in 5 sts], repeat 2 times. skip 2 sts, DC in 3 sts, DC2tog in next 2 sts, DC in top of ch 2. Ch 2 turn
Row 6: DC2tog in next 2 sts, DC in 1 st, [skip 2 sts (those stitches between the squares), DC in next 3 sts] repeat 2 times. Skip 2 sts, DC in 1 st, DC2tog in next 2 sts, DC in top of ch 2. Ch 1, turn. Do not snip yarn, proceed to trim the edges.
EDGE– If you’re using crochet handles
Continuing from last row 6 (see photo 12), SC into each of the single sts in the curve, 2SC in 1st st row and each st row (and also into the ch 2 spaces where we began row 1 on each side). On the other side, 2SC into each st row, SC into each of the sts in the curve, 2SC into each st row around. Join to the 1st SC. snip yarn.
HANDLES
If using ring handles, continue from row 4. After ch 1, turn
Place ring on the edge of the row 4, *SC into the next stitch and through the ring, repeat from * across, do not skip any stitches till last st. on row 4, skip last st (which is a ch 2), ch 1, sl st in the top of the ch 2. 1st handle attached.
Continue to make sts, 2SC in 1st st row (that same ch 2 row), 2SC into each st. row (including the ch 2 spaces where we began row 1) and across to the other side.
2nd ring handle:
Place ring on edge of row 4, ch 1, skip 1st st, *SC into next st and through the ring, repeat from * across, do not skip any stitches till last st. on row 4, skip last st (which is a ch 2), ch 1, sl in the top of the ch 2. 2nd handle attached.
Continue to make sts, 2SC in 1st st row (that same ch 2 row), 2SC into each st. row (including the ch 2 spaces where we began row 1) and across to the other side. Join to the 1st SC. snip yarn, weave in tails
Crochet Handles
Chain 210, slip stitch in second chain from hook and across, chain 1, turn so that the underneath of the chain is facing you, slip stitch in 1st stitch and each stitch across.
Do not snip yarn yet. Pass the handle through the 2nd space on the sides of the bag, arrange it so that it is not twisted, now join both ends of the handle with a slip stitch. Snip yarn, leaving a little tail to sew the ends together tightly.
Weave in all tails, and you’re done!
Thank you for checking out this pattern. Kindly use the share buttons to spread the word. When you make one, do not be shy, share with us on instagram with #yarncraftee or join our private Facebook group to share your projects and find support.